Global Parameters
Global parameters screen allows configuration of application settings.
Depending on the modules installed, some tabs may not appear.
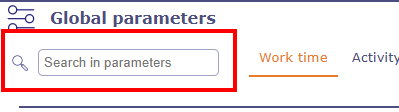
Search in parameters
A search field allows you to find the parameters containing the entered word.
When you choose a setting, the search takes you directly to the corresponding tab and section and the setting is then highlighted.
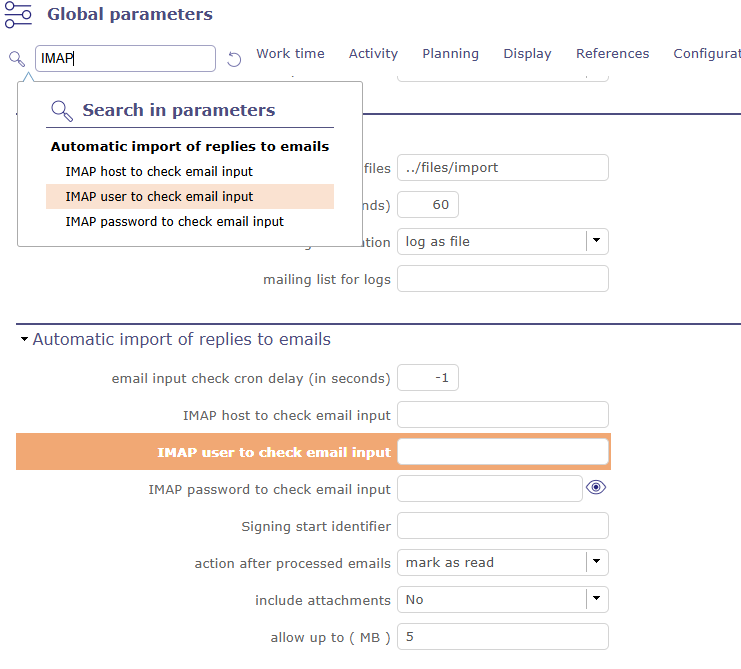
Displaying the result of a search
Tip
Good to know
Moving the mouse over the caption of a parameter will display a tooltip with more description about the parameter.
Tab Work time
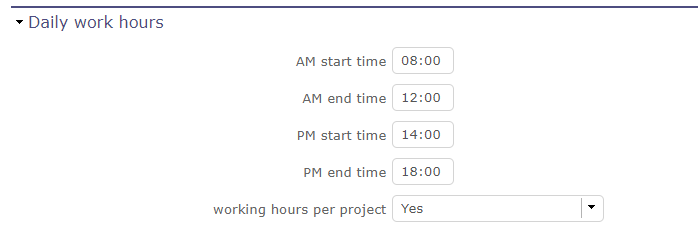
Daily work hours
Definition of the working hours applied in your company.
Used to calculate the time based on “hours worked”.
Working hours per project
You can also apply specific working hours to each of your projects by setting the working hours per project option to yes.
You can then apply specific working hours on the project screen.
Workflow screen
Open days
Possibility to define the working days in the company.
For each day of the week, you can choose between open days or off days.
See also
Resource section Calendars
Note
This parameter are taken into account in : working days on calendars,
The working days on the calculation and the display, the working days on the display of real work allocation.
Units for work
Parameters to determine the units used to calculate the actual work
Unit for Timesheet (real work) & Unit for Workload
Parameters to real work allocation and workload.
The fields Unit for real work allocation and for all work data can be in days or hours.
Number of hours per day
Allows to set number of hours per day.
Warning
If both values are different, rounding errors may occur.
Remember that data is always stored in days.
Duration will always be displayed in days, whatever the workload unit.
Timesheet
Defines behavior of tasks in the real work allocation screen.
Display only started tasks
Display only tasks with the Macro status activated.
Set to first ‘in progress’ status
Change the status of the task to the first “in progress” status when actual work is entered.
Set to first ‘done’ status
Change status of the task to the first “done” status when no left work remains.
Max days to book work (warning) :
Number of days that user can enter real work in the future before getting a warning.
Leave blank if you do not want warning.
This parameter does not apply to administrative projects
Max days to book work (blocking)
Number of days that user can enter real work in the future. This limit is blocking.
Leave blank if you do not want blocking.
This parameter does not apply to administrative projects.
Lock timesheet before validated start date
In the planning modes “must start on the validated date” and “does not start before the validated date”, it is possible to block the resource allocation sheets before the validated start dates entered
Alert resource on input done by someone else
Alert the resource when some real work is entered by someone else.
Select your type of alert : Internal, Email, both or none.
Alert when timesheet canceled by other
Send an alert or mail when timesheet is cancelled by another resource.
Select your type of alert : Internal, Email, both or none
Display pools on timesheet
Possibly to display the pool whose the resource belongs to.
You can manage different trigger settings per recipient
Warning
Resources that do not have access to the imputations screen do not receive these alerts
Show pool to update their left work
This option is only accessible if the previous one is set to no.
When the resource pools are not displayed in the allocation lines, an icon gives you the possibility of displaying at least the remainder to be done for them.

Line of the pool

Line of the pool
Click on
 to view the resource pool row and edit the left work.
Auto update left work on Pool
If a resource in the pool fill real work on a schedulable task in its own name while it has a remaining amount of 0, then the remaining time on the pool will be decremented.
After submit, alert to project leader
After submission what type of alert would you want to send to the project leader
After submit, alert to team manager
After submission what type of alert would you want to send to the team manager
After submit, alert to organism manager
After submission what type of alert would you want to send to the organism manager
If work input to soon, alert to the project leader
If the resource starts filling out actual work on an activity that shouldn’t start on the date of this posting, then the project manager can receive an alert, an email, or both.
Timesheet input format
Week / Month: You can choose between displaying by week or by month directly on the allocation sheet using the dedicated button.
Week: Display will only be done per week.
Month: Display will only be per month Be careful with this display which can cause problems on screens that are too small (<15”)
Hide button “Enter real as planned”
Define whether to show/hide autofill of scheduled work.
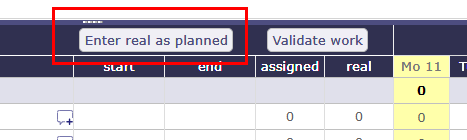
Enter real as planned on the timesheet screen
Tab Activity
Tickets
Specific behavior for ticket management
Only responsible works on ticket
Only responsible can enter some real work on the ticket.
Ticket responsible from product Responsible
Select if the product Responsible is displayed ( always, if empty, never) as Ticket Responsible on that screen
Limit planning activity to those with flag
Display planning activity selected for the ticket
Enable to filter ticket reports by priority
Can display tickets on Report screen by level of priority
Display ticket at client level
Display of tickets on the client screen and on the Contacts screen
Display ticket at version level
Display of tickets on the version screen
Manage accountable on tickets
Display the coordinator as Accountable, so the Responsible is the current actor
Controls and restrictions
Specific parameters for the control and management of restrictions
Allow type restriction on project
Allow to define additional restriction’s type on each project additionally to restrictions defined at project type level.
If so, a Restrict Types button appears in the detail area and allows you to define the type restriction .

Restriction on types by profile hides items
If set to yes, users with profiles won’t see items of unselected types
If set to no, users will just not have possibility to create new items with such types
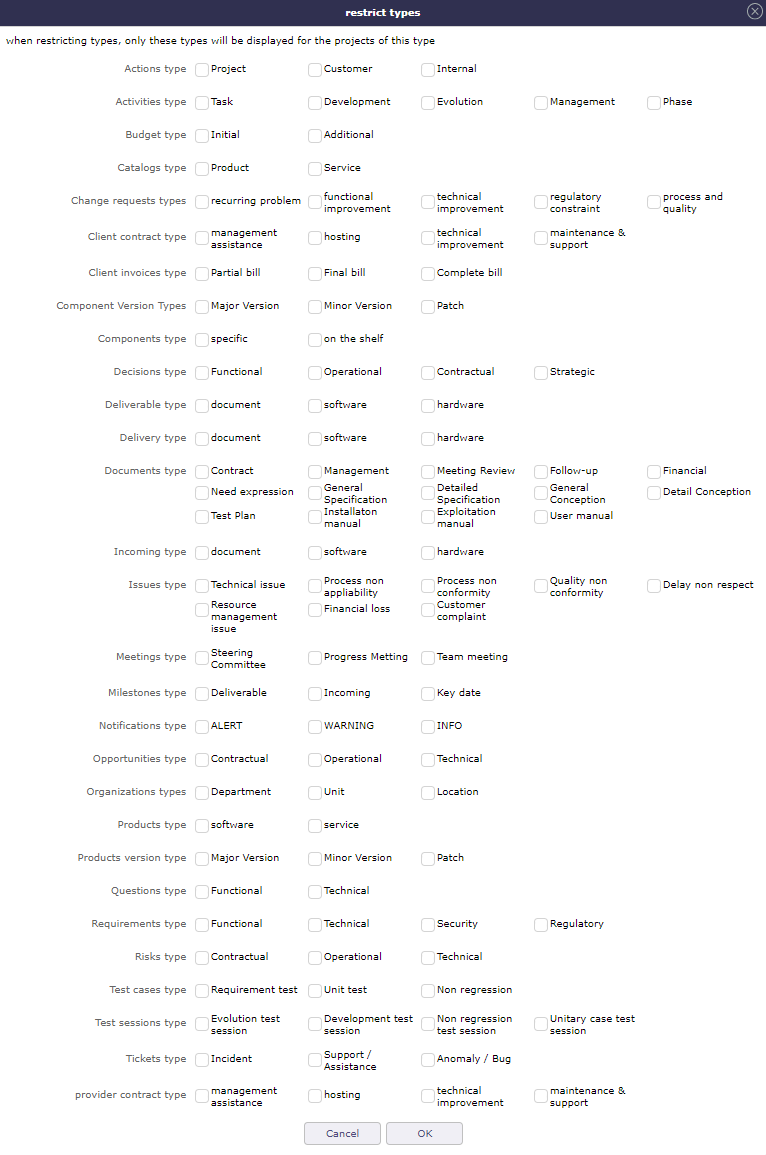
Restrict type box
Limit the functions to those of the resource
On assignments limit functions to those of the resource. Ones with cost and defaut one.
Tag list by project
By enabling this option, tags that are created on a project will only be visible on that project and saved tags will not be added to existing ones on another project.
Leaves system
Allows you to determine who will be the administrator of regulated absences.
The administrator of regulated absences can define the parameters and authorizations of the screens in this module.
Tab Planning
Planning
Specific parameters about Gantt planning presentation.
Apply calculation priority per project
Promote the prioritization of activities to preferentially calculate the tasks of a project together.
Allows to preserve the consistency of a project in particular for parent activities.
Does not prioritize activities with a fixed duration compared to other planning modes.
No allows to preserve behavior existing before V12.0.
Do not start before the validated start date
This option allows you to use the validated dates of the project to start it at a later date.
Planning only starts from this date, as if there was a fixed milestone preceding the project.
Resource timesheets on the project will be blocked before the specified date.
Priority of activities from end date
If this parameter is Yes, the activities will be prioritized according to the validated end date.

Despite its priority place in the WBS, the Evolution X - Analysis activity is scheduled after the Evolution X - Development activity due to its end date later than the second
planning mode for parent tasks
Activities that have sub-activities are planned in a smoothed manner over the duration made up of the sub-activities.
This parameter allows you to modify the behavior of this smoothing
without overbooking
If the resource is already used the duration of the parent activity can be extended
with inter-project overbooking
If the resource is used on another project the resource can be overused so as not to extend the duration of the parent activity
with intra-project overbooking
The duration will be preserved by possibly overusing the resource
Show resource in Gantt
Select if the resource can be displayed in a Gantt chart, and format for display (name or initials or none).
Apply strict mode for dependencies
Defines if a task can begin the same day as the preceding one.
If yes, the successor should begin the next day
If no, the successor can start the same day.
Manual progress of fixed-duration activities
Choose whether the progress should be calculated or entered manually.
Possibility of managing activities on real time
If yes, you correlate the validated, assigned, actual loads and the rest to be done.
That is, the validated load, the assigned load and the revised (reassessed) load will always be equal.
If so, the addition of an “activity over time” option is added to the activity types.
Warning
This option is not available for activities managed in work units.
Default overuse mode in planning calculation
You can automate the overuse calculation on the Gantt chart.
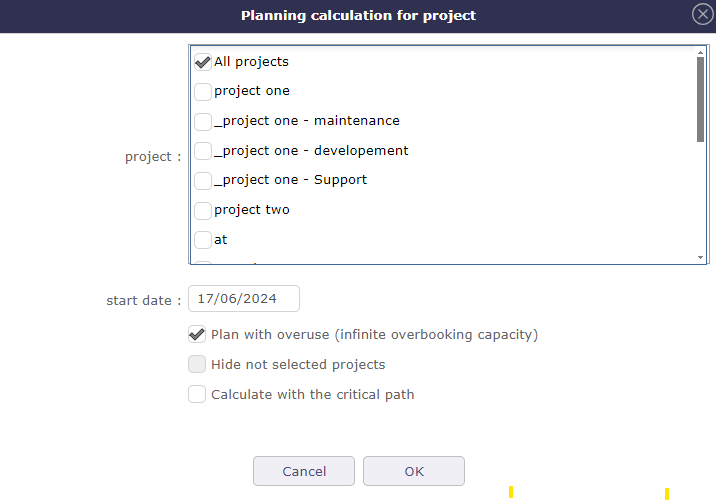
Automatic calculation of overuse
In this case, the checkbox will be automatically enabled for each calculation launched.
Manage inherited end date
End date can be inherited from successors or parents.
Gantt bars are displayed in pink if they are driven by inherited end dates.
Whether this parameter is Yes or No, the last priority criterion is the order in the WBS.
Prioritization by end date occurs just before this default criterion.
Manual planned interventions enter work as
Choose whether the work entered in the manual planning should be saved as real work or planned work.
Effect of capacity on planned interventions
Limit duration
Limit duration a resource with capacity 0.8 can be planned only one half-day of 0.5d
Determine Duration
Determine duration a resource with capacity 0.8 can be planned on 2 half-days of 0.4d each
None
A resource with capacité 0.8 can be planned on 2 half-days of 0.5d each
max items to display in Gant Planning
You choose the number of rows you display in the Gantt chart.
Milestones
Specific parameters for Milstones management
Auto link the milestone
It optionally allows you to display the element linked to the milestone (The option above should be on “yes” to have access to the selection of milestone targetted)
Set milestone from product version
It optionally allows you to automatically retrieve the milestone from the milestone of the Project Version.
Update milestone responsible from deliverable
Update milestone Responsible automatically when the Responsible of deliverable has changed.
Update milestone responsible from incoming
Update milestone Responsible automatically when the Responsible of deliverable has changed.
Update deliverable responsible from milestone
Update deliverable Responsible automatically when the Responsible of mielstone has changed.
Update incoming responsible from milestone
Update incoming Responsible automatically when the Responsible of milestone has changed.
Allocation & Assignation
Specific parameter for Pool of resource et behavior on activities.
Automatic allocation of pool resources
Automatic allocation of resources of the pool when allocating a pool to a project.
Explicit allocation
When you assign the pool to the project, the resources will appear in the allocation table in addition to the pool row.
And in the drop-down list of resources for assigning to activities.
Implicit allocation
When you assign the pool to the project, only the row of the pool is shown in the allocation table.
The resources composing it are however present in the drop-down list of resources on the table of assignments.
No
None of the resources making up the pool are visible in the assignments table and they will not appear in the drop-down list of assignments.
Status change on assignment
When you assign a resource to a schedulable element of ProjeQtOr, you can modify the status of the element when creating an assignment.
For this behavior to be effective, you must specify which status will trigger this behavior. See: Status
When creating the assignment, the status will be automatically changed unless it was already in the trigger status..
Automation
Parameters to manage automations
Consolidate validated work & cost
Select if validated work & cost are consolidated on top activities and therefore for projects.
Select whether posted work and cost are consolidated across major activities and therefore across projects.
It is therefore the charges and costs of the sub-activities that will be transferred to the “mother” activities and therefore to the projects.
Never: Not consolidated. Charges and costs will only be entered and consolidated manually.
Always: The values are always replaced on the parent activities and the project. If the parent activities were filled in then the values will be overwritten by the child activities.
Only is set: Replaces values only if parents are given. An exception is made if the parent is set to 0 / “null”. In this case, the parent is not overwritten.
Auto set Responsible if single resource:
Behavior about management of responsible, including automatic initialization of responsible.
Automatically set Responsible if not set and by the only one resource allocated to the project
Auto allocated manager to the project:
Automatically create an allocation for the project Manager to the project. He should be a resource.
Auto set responsible if needed:
Automatically set Responsible to current resource (as using the element) if not set and if a Responsible is required (respecting access rights)
Auto assign responsible to activity:
Assign automatically the Responsible to activity
Auto set parent status:
Automatically set the status of the parent element (in the WBS structure) from the status of the child elements.
So that when the first child changes to “in progress”, the parent changes to “in progress” and when all children are done, the parent changes to done.
Copy items directlty to status “recorded”
When you copy elements in projeQtOr, many options are available as well as the possibility to check a box that will move the copied element to the first state of your workflow.
Without this box enabled, the element will remain in the intermediate state “copied” which could cause errors in calculations or automation.
Enabling this setting allows you to automatically check the box in the element copy function.
Tab Display
Display
Graphic interface behavior and generic display parameters.
Name of the instance
Change the window’s name. The name appears at the top center of the window.
Max number of projects on today
Limit the display of the “today list”. items are generally ordered by issue date increasing.
Max items to display in Today lists
Limit the display of items displayed in sections of the Today screen. Items are generally ordered by ascending issue date.
Quick filtering by status
Allow to filter on lists the element by status checking boxes. Refresh to make appear on boxe a new state just created on list .
Quick filtering by tags
Allows you to filter items on lists by tags by checking the corresponding boxes.
Save tags directly under the item name. Display existing tags using the activation switch and filter your lists using tags.
hide hours on ticket due dates
This option allows you to display due dates on tickets without times.
Default values for user parameters
Default values for user
New interface
Choose between interface v8.6 or the new interface v9.0
Theme colors
The v9.0 interface is composed of two main colors which are declined throughout the application in different hues and saturation to keep the same charter spirit.
Interface main color: choose the main color that will be applied to the main architectural elements
Interface secondary color: choose the secondary color that will be applied on the navigation and highlighting elements
Color discs: You have pre-recorded color discs available. One offers the colors of classic ProjeQtOr. Two others are proposals. The fourth will take the colors that you have saved in the global settings for your instances. They are accelerators to apply your themes.
Default language
Choose among 19 languages / easy come back with translation in target language.
Default theme (only available with version 8.6)
More than 30 themes choices.
First page
Choice of the first visible screen after the connection.
Lock first page
Allows the administrator to select the screen of their choice and block it for users.
They will not see the setting in their connection menu or in user settings > Display
Menu top mode view
You choose how your favorites will be displayed. As text, icons, or both.
Menu left mode view
The top menu is invisible or not at each connection.
Choose how your principal menu will be display. Text or icons and text.
Tip
Menu v9.0
To show or hide the icons of the new menu, right click on the menu.
Icone size in menu (only available with version 8.6)
Icon size are default : user can overwrite these values.
Display of the upper menu (only available with version 8.6)
The top menu is invisible or not at each connection.
Display of the left menu (only available with version 8.6)
The top menu is invisible or not at each connection.
Create new item on pop-up
You determine if the global creation button will open a pop up or go directly to the screen of the element you want to create.
Display history
No
Yes
Yes with work
On request trhough specific button
To show or hide the icons of the new menu, right click on the menu.
The button  will then be displayed in the menu of the details area of each element.
Editor for rich text
Choose your favorite text editor.
Not applicable value
Choice of the symbol defining the non-applicable values.
On the global view the value of the field that has no applicable value for the given column will display this symbol
Restrict project list
When creating an element, name of the project stays like than the one selected at the selector or on contrary offers choice on global list of projects
Export in XLS or ODS
Choose the format in which you want to export either in native excel format or with the ODS format of OpenDocument.
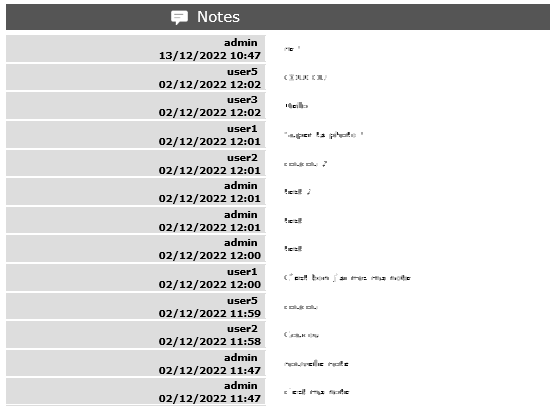
Displaying notes in discussion mode
By default, the notes are displayed in ascending order of creation. To quickly and easily view the replies to certain notes, this option allows you to display the replies under the corresponding notes with an indentation to the right.
Show only notes on Activity Stream
if so, you will not see the status change and item update.
Not receive own emails
You don’t receive the emails you create.
Order notes ascending in email model
Choice of display of notes in the email template.
If YES, you display the notes in ascending order of creation. From the first ID to the last. Some notes containing answers will therefore not necessarily follow the order of display.
If NO, You display the notes as they appear on the screen with the answers under the corresponding notes
In email templates you can call notes in different ways.
With the codes ${NOTES} and ${NOTESTD}
${NOTESTD} allows you to display notes as they are by default.
Notes displayed by default in emails
${NOTE} allows you to display notes on a new table model.
Notes displayed in spreadsheet in emails
See also
List quotations, commands and invoices on client
Display or not the list of financial elements related to the customer on the screen of the latter.
Please note that the parameter also exists on the user side. If the latter is not activated also then the financial elements will not be visible.
Enable direct update of test case run
Display or not the list of financial elements related to the customer on the screen of the latter.
Colors of activities by type in the planning
Display or not the list of financial elements related to the customer on the screen of the latter.
Format used to represent dates
Choose the date format you want to use.
Format used to represent time
Choose 24h or 12h time format to display times in the app.
Tab References
Format for reference numbering
Sections for format references
Prefix format for reference
Allows to define reference formats for items of element, documents and bills.
Can contain prefix :
{PROJ} for project code,
{TYPE} for type code,
{YEAR} for current year
{MONTH} for current month.
Number of digits for reference number
Indicate the number of digits you want to appear in your reference.
Change reference on type or project change
Change the reference on type change of element will generate missing numbers in reference.
Document reference format
Sections for document format references
Document reference format
Format can contain :
{PROJ} for project code,
{TYPE} for type code,
{NUM} for number as computed for reference,
{NAME} for document name.
You can allow or forbid downloading locked files in this section.
Version reference suffix
Suffix can contain {VERS} for version name.
Separator for draft in version name
Choose the sign for the separator of the draft.
Preserve uploaded file name
If yes, the file is downloaded with the name of original file.
If no, the document take the reference formatted name.
Forbid download of locked document
Forbid document download if yes is checked.
Add version of document without uploading a file
Possibility to add a new version without file.
Bill reference format
Sections for bill format references
Invoice reference format
Reference format : can contain {NUME} for version name.
The {NUM} code can only be used for the document.
Number of digit for invoice number
Choice of the number of digits to display in an invoice.
Tab Configuration
Product and Component
This menu contains all the parameters for configuration management
Display Business features
Filter on date.
Display language in Product/Component (Version)
Enable language.
Display contexts in Product/Component (Version)
Enable contexts.
Display Tenders on Products, Components, Versions
Display a section to list linked Tenders on products, component, product version and component versions.
Include sub-products in structure
Include sub-products in display of product structure (flat or not).
Versions
This section allows you to manage more details in the behavior of the elements linked to the versions.
Display the start and delivery milestones
Display start and delivery milestones for product/component version and delivery dates in flat structure.
List of activity on component version
Display the list of activity.
Direct access to product / component full list
When selecting a component, we go directly to the full list (with filter capacity), without going through the pop-up window.
Automatic format of version name
Ability to choose a preformatted format for version names.
Separator between name and number
Choose the character of the separator for version names.
Auto subscription to versions
Subscription automatic to versions or components when you suscribe to product or component.
Types of copy of Component Version
You can choose between :
Free choice
Copy structure from origin version
Replace the origin version with new copied one
Enable Product Versions compatibility management
Display compatibility section in product version details.
Display product version on delivery
Allows to link a delivery to product version.
Sort versions combobox in descending order
Change sort order for versions in combobox to have more recent first (descending on name).
Sort version composition and structure on type
Sort version composition and structure by type ascending and name descending.
Manage component on requirements
Manage component and target component version on requirements.
Manage component on change requests
Manage component and target component version on change resquests.
Do not add closed and delivered versions to a project
When adding a product to a project, do not add its closed and delivered versions.
Allow activities on delivered version
Include delivered products versions in target product version list for activities.
Automatically set component version if unique
Automatically set component version if there is only one component version of the selected component that is linked to the selected product version.
Tab Financial
Input of amounts for expenses
Parameters for choosing the input method for expenditure amounts.
Input mode for amounts
Defined for expenses items if the amounts must be entered without taxes and calculated in with taxes or vice versa.
Input mode for invoice lines
Defined for expenses items if the total bill lines feed the total with or without taxes. The parameter is priority if there a bill lines.
Input of amounts for incomes
Parameters for choosing the method of entering income.
Input mode for amounts
Defined for incomes items if the amounts must be entered without taxes and calculated in with taxes or vice versa.
Input mode for invoice lines
Defined for icomes items if the total bill lines feed the total with or without taxes. The parameter is priority if there a bill lines.
Automation of financial
The Deferral of expenses option occurs during the automatic generation of an expense from an offer, order or invoice.
If the expense is linked to an offer, an order AND / OR an invoice, then this is carried over to the related elements. This update is recursive.
If the expense is generated from an invoice, it is reported on the order linked to the invoice and on the offer linked to the order.
Revenue and Work unit managment
Parameters used in the unit of work catalog.
Number of complexities
Parameter used to define the default maximum number used in the unit of work catalog.
Copy revenue into validated cost of activities.
Copy revenue into validated cost of activities.
Enable work command.
You link your activities managed by the work units to an order.
This will be decremented by units of work already carried out and invoiced. You can then invoice precisely for the work already done.
Translation
Choose how the monetary units behave in your area
Currency
Choose your symbol displayed on each monetary box
Currency position for cost display
Symbol sets before or after each monetary box
Multi-currency
It is possible to define a local currency for each project. The project carries the conversion rate between global currency and local currency.
Allow local currencies per projet
Allow to set a local currency for each project.
Subprojects automatically inherit the local currency.
Data is entered in local currency and consolidated in global currency.
Show data in global currency
Show date in global currency when project uses a local currency.
Tab Mailing
Emailing
Settings allowing the application to send emails.
Set the administrator’s email address, with the option to choose a different “From” and “Reply To” address, as well as the display name.
You must configure the login information with the credentials provided by your email service provider.
The maximum size for sending emails is expressed in bytes by default if you do not specify the units.
You can use kilobytes (KB), megabytes (M), and gigabytes (G) with integer values.
The size must be less than or equal to the PHP parameter “upload_max_filesize”.
replies for email
To reply to these emails, you must configure automatic import for replies in the Automation tab; otherwise, they will not be processed by the application.
A reply to an email will be added to the existing item as a note and if an attached file is attached to the reply email, then the file will also be added to the attached files
Tip
1K will stand for 1024 bytes.
Mail titles
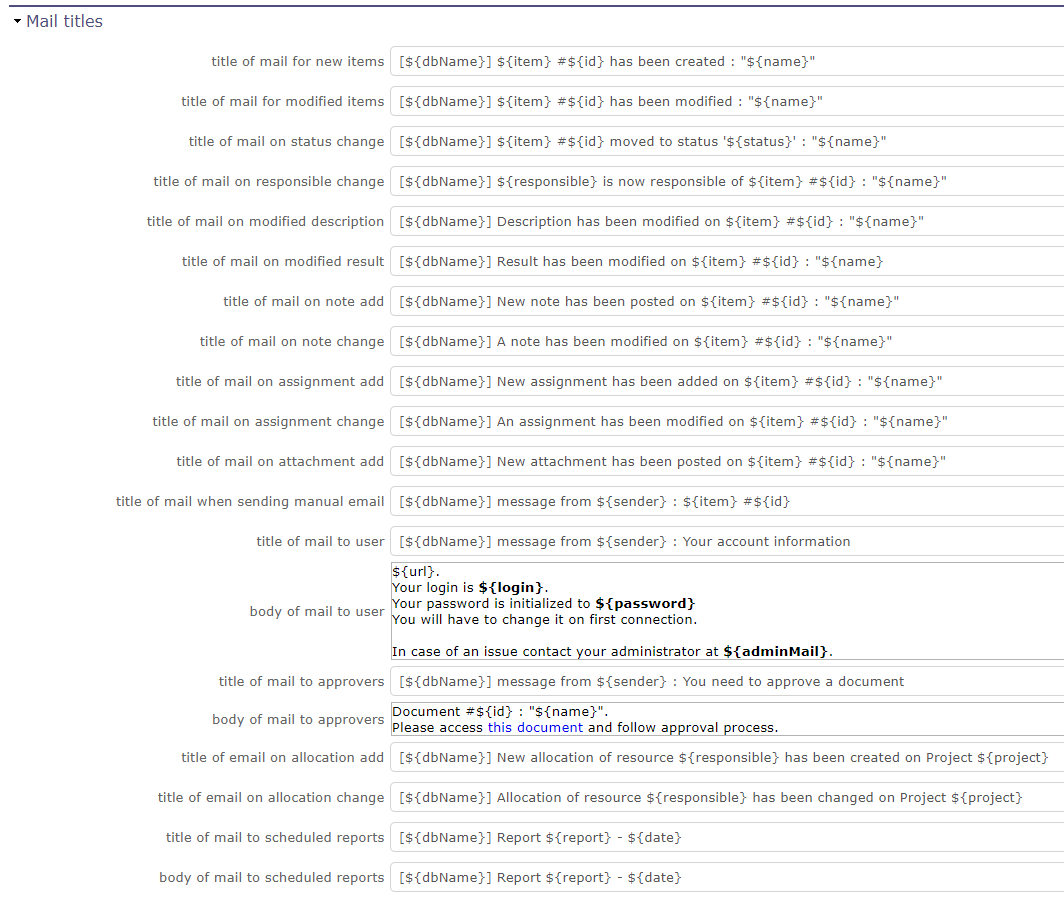
Mail titles section
Parameters to define title of email depending on event.
It is possible to use special fields to call a function or data of the project.
Automatic emails grouping
Parameters to define if the email group is active or not.
Activate email grouping
When email grouping is enabled, automatic emails sent within the defined period are grouped into a single email.
For example when the status of an element has been modified several times in less than Xs then you will not receive an email for each change of state.
Grouping period (in seconds)
Defines the period (in seconds) during which if an email is send after another on same item.
Then emails are grouped into single one.
How to treat different formats
If grouped emails refer to different templates, you can :
send all messages, one for each template
Only send the last message
Merge all messages and send a single email
You’ll can see this email in the email to send screen in the Tools menu.
Test email configuration
You can test the settings of your email submissions.
Send email to
Sent a email to check sptm configuration.
Warning
This operation saves global parameters.
Tab Authentication
User and password
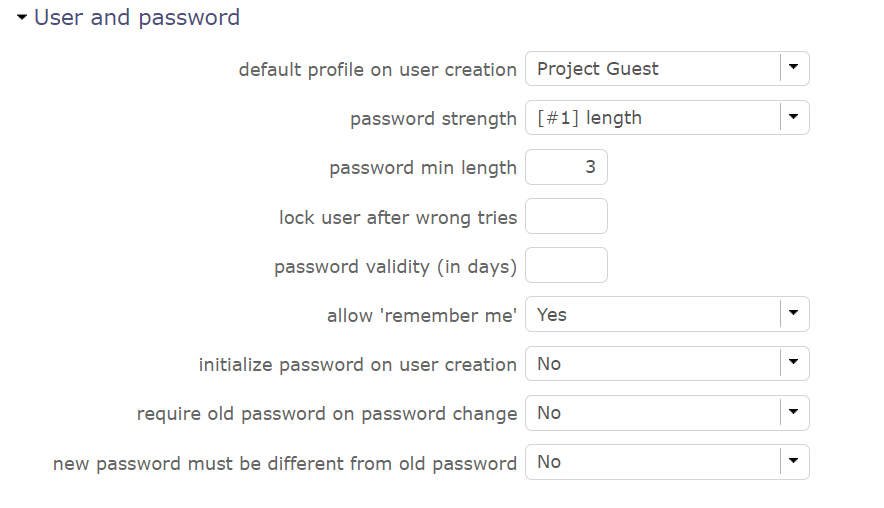
Authentication screen
Parameters to manage how the connection behaves
default profile on user creation
You can choose the default profile and password when you create a new resource/user/contact.
This profile can be changed on each project.
Password strength
You define the difficulty of your password.
Password length, if special characters or numeric characters are used.
Password min length
You define the length of your password.
Lock user after wrong tries
You can choose to block the user after x connection attempts.
Password validity (in days)
You can define the validy period of your password. After this period, you will have to renew your password.
Allow ‘remember me’
You can display or no the check box on the login screen “remember me”.
Initialize password on user creation
You can initialize password on user creation. The application will define a new password to random value.
You can reset all the password with the multiple update fonction
Require old password on password change
ProjeQtOr verify old password on password change.
New password must be different from old password
If you have a regular password change policy, you can set the option to prohibit the same password.
LDAP Management Parameters
All the necessary parameters for connecting your projeqtor instances with your corporate LDAP
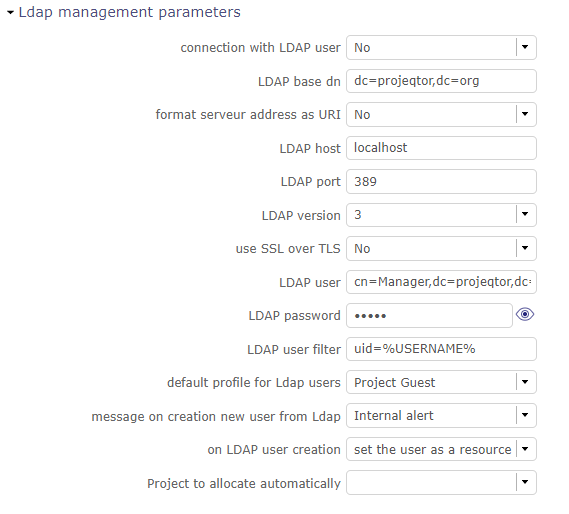
LDAP
Set the base dn, host, port, version…
Default profile for Ldap users, message on creation new user from Ldap,
Actions on LDAP user creation
Project to allocate automatically…
Single Sign On SAML2
Single sign-on is a method that allows a user to access multiple computer applications (or secure websites) by performing a single authentication.
With the single sign on you do not go through the login screen of projeqtor but by a screen dedicated to single sign-on
When connected to the SSO service, the service tells each application that the user is logged on.
This avoids having to connect to applications one by one.
In concrete terms, the site or service to which the user is trying to connect makes a request to the server or the identity provider’s site. This one asks if the user is connected. If so, he transmits the information.
Depending on the protocol used, the two sites exchange keys, signatures and / or other information to verify the identity of the user.
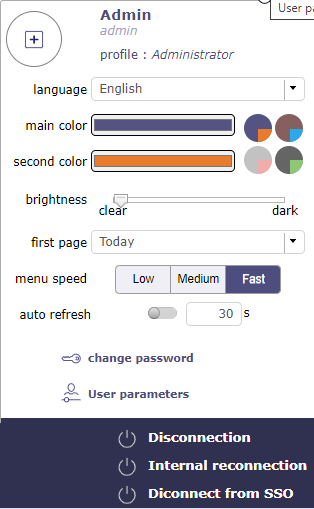
Disconnection screen
When you want to disconnect from ProjeQtOr with the SSO method, the logout screen gives you several options.
local disconnection of projeqtor. I do not leave my SSO session
Internal reconnection: I reconnect to ProjeQtOr locally. I leave my SSO session. I should identify myself again
SSO disconnect. I leave my SSO session. I should identify myself again
Parameters
This is an SSO connection via the SAML2 protocol
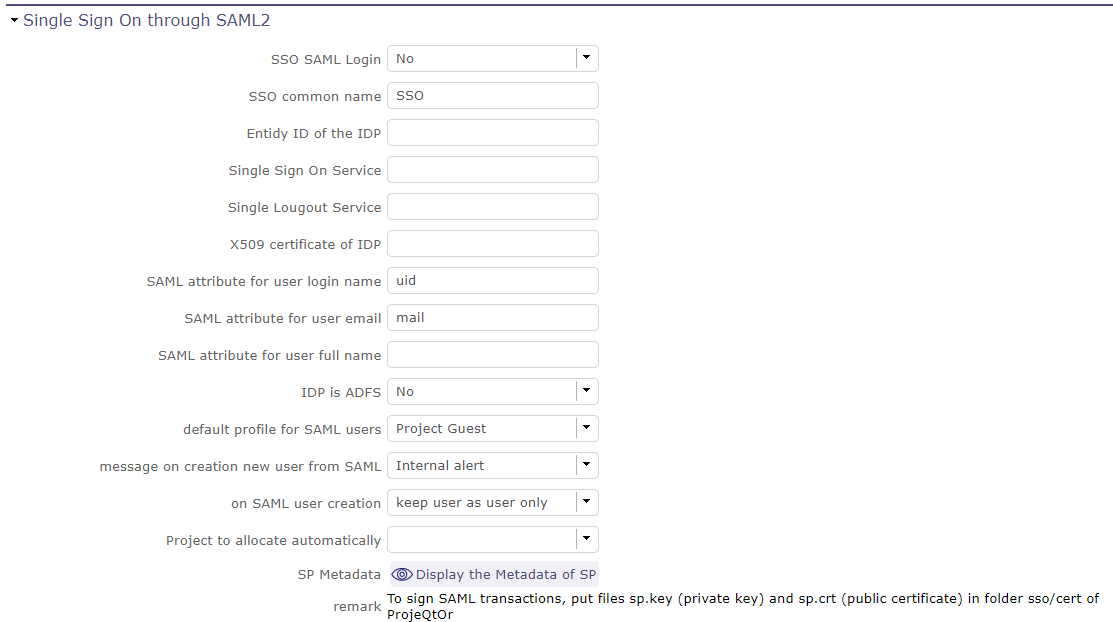
Global parameters: LDAP
Set the Entity ID, the IDP certificate, the single sign on and logout…
Default profile for users, message on creation new user from SAML,
And some parameters for users
Tab Automation
Management of automated service (CRON)
Parameters for the Cron process.
Defined frequency for these automatic functions
It will manage :
Alert generation: Frequency for recalculation of indicators values.
Check alert: Frequency for client side browser to check if alert has to be displayed.
Import: Automatic import parameters as below.
Warning
Cron working directory should be set out of the path web..
Automatic archiving of history
This section allows you to manage the behavior of the history.
Archive history older than (in days)
Determines how often your history is archived.
Start time of daily archiving
Choose the time at which the daily archiving will start.
Archive all history for idle items
Choose whether the history of closed items should be archived or not.
Automatic import of files
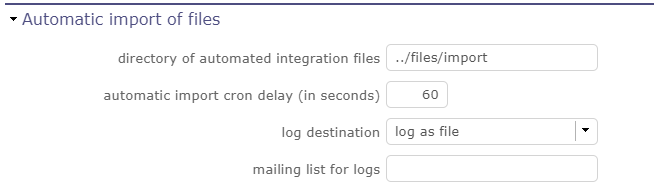
Automatic import of files
Automatic import settings for cron processes.
Warning
Directory of automated integration files should be set out of the path web.
Automatic import of replies to emails
Defined parameters for the “Reply to” process
It will manage connection to IMAP INBOX to retrieve email answers.
Email input check cron delay (in seconds)
Delay of -1 deactivates this functionality.
Email reception
When you have completed the IMAP settings for receiving emails, you receive your email with a new header. See the image below.

receiving an email settings
You always find the name of the item that is related to your application. A single click takes you to the item page.
The line in the header tells you where your answer should be positioned to allow you to retrieve the response text in your ProjeQtor instance without the original message.
Signing start identifier
When you have completed the IMAP settings for receiving emails, you receive your email with a new header. See the image below.
The fields allows you to identify the beginning of your signature in order to avoid retrieving the signature in the response.
For example, enter, so that ProjeQtOr recognizes that your signature begins with this word. He will not take back everything behind.
Action after processed emails
You can determine what action to perform when receiving the email.
Mark as read, which is the default
Removal
Global parameter for automatic import for replies email
Note
IMAP host
Must be an IMAP connection string.
To connect to GMAIL input box, host must be: {imap.gmail.com:993/imap/ssl}INBOX
You must set these parameters if you want to use the Not receive his own mails option in the user settings
Automatic planning calculation
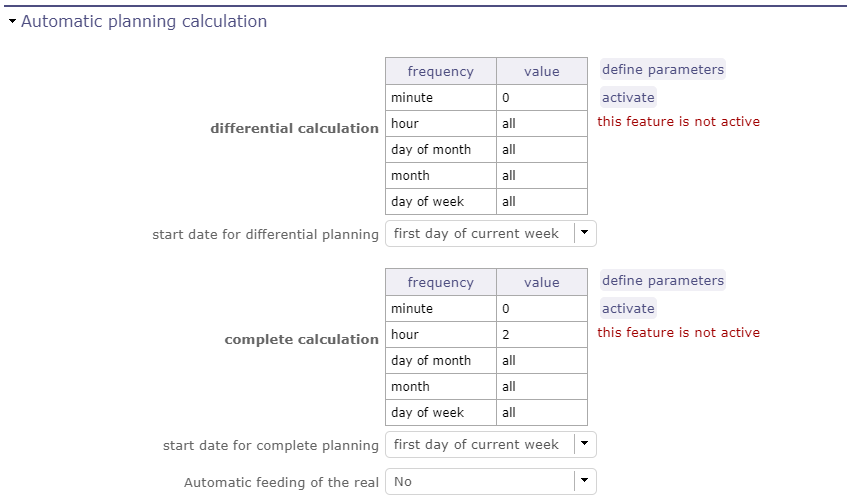
Activated or desactived this feature by simple click
Differential calculation
Project planning is recalculated only for those who need to be. A data or more has been changed into the project so a new calculation is expected.
Complete calculation
All projects planning are recalculated.
Automatic feeding of the real
You automatically fill in the actual work from the scheduled work up to a given date.
The automatic calculation of projects from the day after this date is triggered.
The actual work is automatically entered from the scheduled work until the day before the start of the schedule calculation.
Warning
For security, and to avoid overlapping with a manual input of reality, if the resource has reality for a given date, we do not copy the possible planned existing in reality.
For each scheduled job found, if no job exists for the relevant resource on the date of the scheduled job, copies the scheduled job to an actual job.
We will mark the actual work entered automatically (technical zone type label) to distinguish between automatic feeding and manual feeding.
This area will not be processed for screen renderings, but will analyze any unexpected behavior.
Frequency
Select the frequency on the calendar by clicking on the button defined parameters and choose the schedule, day, month.
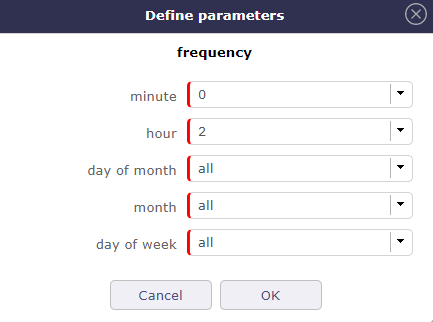
Define parameters
Start date for
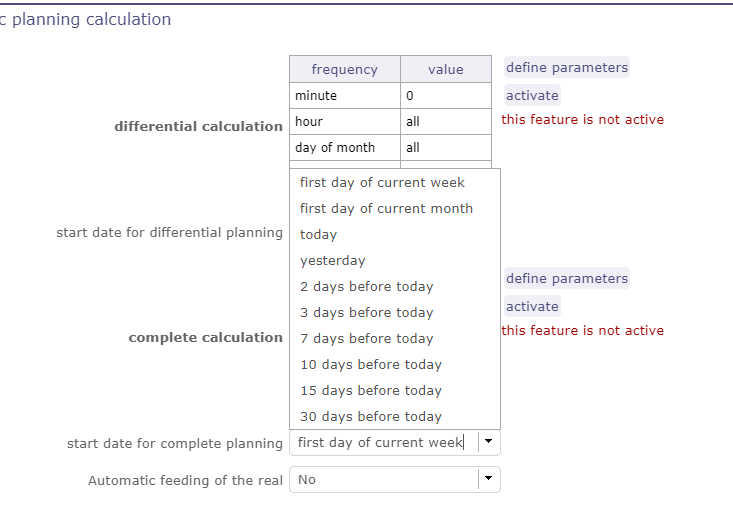
legend
Select when you want to recalculate project(s)according the date of today’s date
Generation of alerts if real work is not entered
Specific settings for alerts based on a profile.
An email is sent on the agreed date.
Click on the button Define Parameters
Select the frequency of the calendar with which the emails will be generated and sent to the profile.
See: Management of automated service (CRON) to set the send frequency.
In addition to the sending frequency, you can refine the generation with several additional options.
Control input up to
Select when you want to be controlled: current day, previous day or next days.
Number of days to control
Choose how many days will be controled
Send alert to resource
Choose how alerts will be sent, Internal alert, email, both or none
Only incompletes imputation
The goal is to be able to send alerts on charges only if the entry is incomplete, not if it is greater than the capacity of the resource.
With the option checked, when generating alerts, an entry greater than the capacity of the resource does not trigger an alert.
Warning
All days of the week, open or off days are taken into account.
Off days in real work allocation will not send you an alert.
Tab System
Files and directories
Definition of directories and other parameters used for Files and documents management.
Fill in the weight and the access paths to the storage of your documents and attached files.
Warning
Attachments Directory and Root directory for documents Should be set out of web reach.
Temporary directory for reports Must be kept in web reach.
Translation data
Parameters to define character sets, their encoding, their behavior… for saving files on the server.
Charset to save files on server
Keep empty for Linux servers, files names will be stored in UTF8.
For windows OS server, define charset as “windows-1252” (for western europe) or similar corresponding to your localization.
Time zone
Select your time zone.
Separator for CSV files
Choose the field separator for csv exports.
Export CSV to UTF-8 format
Preserve UTF-8 for exported csv files. If set no, will encode in CP1252 (recommended for windows in English and western Europe Languages).
Security - Message when a try to hack is detected
To secure the solution and avoid Cross Site Scripting type attacks, we have implemented CSRF token.
Configure the email that will be notified if a try to hack security flaw is detected.
Several possibilities of sending are configurable.
Miscellaneous
Settings for the update.
Check for new version
Auto check (or not) for existing new version of the tool (only administrator is informed).
PDF export
Basic settings for PDF exports.
Memory limit for PDF generation.
Size In MB. Too small can lead to PDF error but too big can crash the server.
Font for PDF Export.
Freesans give great portability for non ANSI characters - Helvetica give smaller PDF files.
SSL connection to database
Allows to set up a secure SSL connection:
SSL Key
SSL Certification
SSL Certificate Authority
Enter patch to corresponding files to enable SSL connection to the database.
Warning
Take care that these files must exist and be valid SSL files.
If values are incorrect, the application will not work any more, and you’ll have to manually fix parameters in the database.
Special Fields
Special fields can be used in the title and body mail to be replaced.
by item values :
${dbName} the display name of the instance
${id} id of the item
${item} the class of the item (for instance “Ticket”)
${name} name of the item
${status} the current status of the item
${project} the name of the project of the item
${type} the type of the item
${reference} the reference of the item
${externalReference} the external reference of the item
${issuer} the name of the issuer of the item
${responsible} the name of the responsible for the item
${sender} the name of the sender of email
${sponsor} the name of the project sponsor
${projectCode} the project code
${contractCode} the contact code of project
${customer} Customer of project
${url} the URL for direct access to the item
${login} the user name
${password} the user password
${adminMail} the email of administrator