Ticketing
Ticket
A ticket is a kind of task that cannot be scheduled in a unitary manner.
This is usually a short-lived activity for a single ticket that gives feedback to the issuer or to keep track of the result.
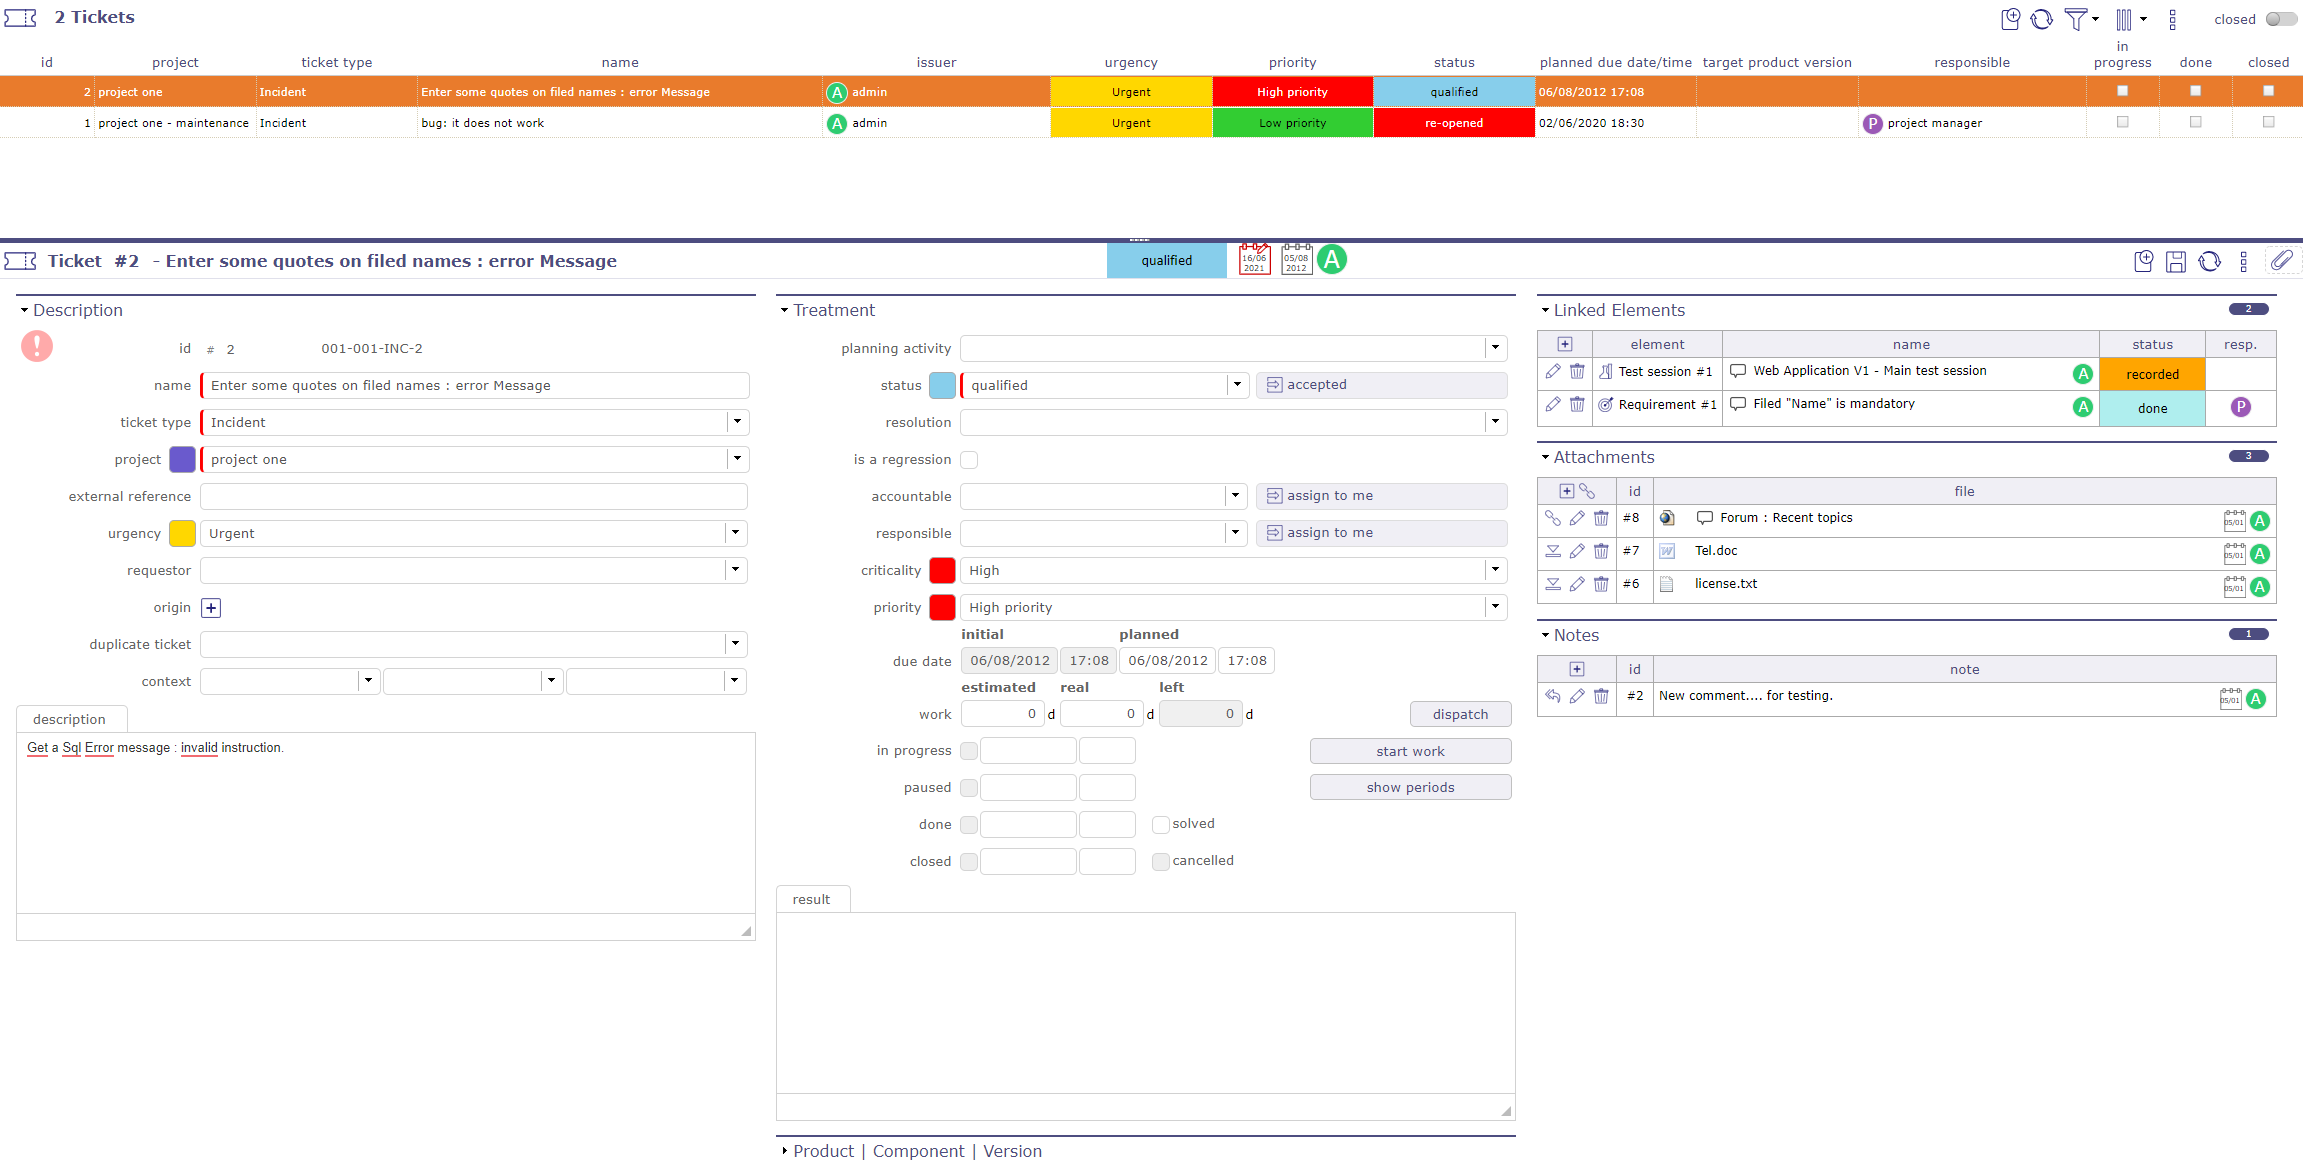
Tickets management screen
It can be globally planned as a general activity, but not unitarily.
For instance, bugs should be managed through tickets :
You can not plan bugs before they are registered.
You must be able to give a feedback on each bug.
You can globally plan bug fixing activity.
Tip
Possibility to define that only the responsible of ticket can enter real work.
This behavior can be set in Global parameters screen.
Dates
Due dates
Initial and planned due date allows to define a target date for solving the ticket.
If a deadline definition for a ticket exists, the initial planned date is automatically calculated with this deadline.
See also
Delays for tickets screen allows to define ticket delay.
Planned due date
Is used to define a target date after evaluation.
Automatically initialized to the initial due date.
Monitoring indicator
Possibility to define indicators to follow the respect of dates values.
Product, component and versions fields
Allows to identify the product and component relating to the issue.
Identifies from which versions, the issue occurs and to which versions a resolution will be applied.
Versions identified
A ticket can identify all versions allocated.
Possibility to define a main version and the other versions allocated.
See also
Responsible of product
A responsible can be defined for a product or component.
If a product or component is selected, the responsible defined can be automatically assigned to the ticket.
Tip
Ticket responsible from product responsible, in Global Parameters, allows to define, if the defined responsible is automatically assigned to the ticket.
Original product version & Original comp. version
The list of values will be filtered depends on the selected value in fields “Product and component”.
Click on
 to add a other version, see Multi-version selection.
Section Treatment
Field |
Description |
|---|---|
Planning activity |
Activity where global work for this kind of ticket is planned. |
|
Actual status of the ticket. |
Resolution |
Ticket resolution. |
Regression |
Notion of regression can be added. |
Resource who is responsible for the ticket. |
|
Criticality |
Importance of impact on the system, as determined after analysis. |
Priority |
Priority of treatment. |
Initial due date |
Initial target date for solving the ticket. |
Planned due date |
Actual target date for solving the ticket. |
Estimated work |
Estimated workload needed to treat the ticket. |
Real work |
Real workload spent to treat the ticket. |
Left work |
Left workload needed to finish the ticket. Automatically calculated as Estimated – Real Set to zero when ticket is done |
Box checked indicates the ticket is taken over. |
|
Box checked indicates the ticket has been treated. |
|
Solved |
Box checked indicates the ticket has been solved. |
Box checked indicates the ticket is archived. |
|
Solved |
The box is automatically checked or unchecked, according to the resolution selected |
Cancelled |
Box checked indicates the ticket is cancelled. |
Target product version |
Product versions for which a resolution of issue will be delivered. |
Target comp. version |
Component versions for which a resolution of issue will be delivered. |
Complete description of the resolution of the ticket. |
Note
Priority is automatically calculated from Urgency and Criticality values. This can be changed manually
See also
Note
Target product version & Target comp. version
The list of values will be filtered depends on the selected value in fields “Product and component”.
Click on
 to add a other version, see Multi-version selection.
Button Start/End work
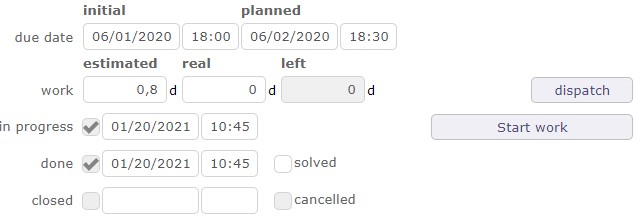
The start Work / Stop Work button is a clock on / off timer.
If the logged in user is a resource, he or she has the option to start working on the ticket.
Click the “Start work” button to start timing the processing time on the ticket.
The start time is then displayed under the button and the button changes name.

Once the work is done, press the “stop work” button.
The spend time will automatically be converted as real work.
It’ll be transferred on planning activity if it is set.
A decrease in “left work” on activity will be carried out.
if the ticket goes into a paused state then the work started with the start work button will be stopped.
Important
Closing the application or starting work on another ticket will automatically stop the current ongoing work.
Button Dispatch
This button allows to dispatch ticket.
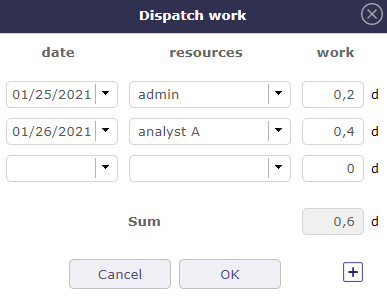
Button Show periods
You can calculate the time spent between the start of processing, which corresponds to the receipt of the ticket and the end of processing of a ticket, that is to say when it goes to the done state, with the possibility of subtracting waiting periods thanks to the “paused” state macro.
The passages from an active macro-state to a non-active macro-state (paused or done), are recorded thanks to the start and end dates of each period. This table is updated automatically with calculation of the duration in working hours and the duration in calendar hours when the end date of the period is entered.

Status period
Planning activity
Planning activity field allows to link the ticket with a planning activity.
If the global parameter limit Planning Activity to those with flag is set to yes then:
You must check the “Planning activity” box on the activity to be linked.
It will then be visible in the planning activities list of your ticket.
Work on the ticket will be included in this activity.
After saving the option, new fields are displayed.
You can see the number of tickets linked to this activity and time information corresponding to all of these tickets.
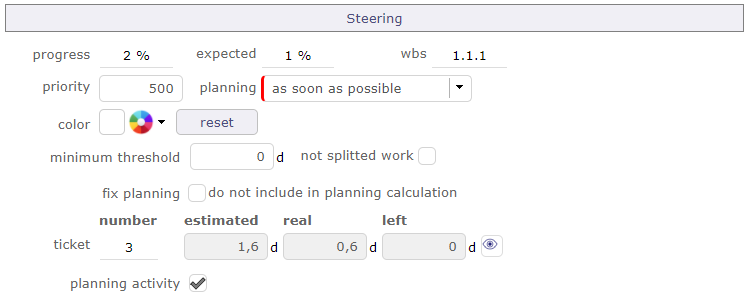
New fields displayed after saving the Planning activity option

List of tickets linked to the activity
Real work
Put the real work from tickets to the resource timesheet.
When a resource has entered the real work on the ticket and the ticket is linked to a planning activity.
The resource is automatically assigned to this activity.
Real work set on tickets is automatically set in resource timesheet.

Imputations real work on related tickets.
The tickets are very dependent on the planning activity.
The time indicated by the resources will be decremented to that planned for the activity.
Multi-version selection
In the version fields, it’s possible to set several versions.
Priority value calculation
Priority value is automatically calculated from Urgency and Criticality values.
Priority, Urgency and Criticality values are defined in lists of values screens. See: Priorities, Urgencies and Criticalities screens.
In the previous screens, a name of value is set with numeric value.
Priority numeric value is determined by a simple equation as follows:
Default values
Default values are determined.
You can change its values while respecting the equation defined above.
mailbox for tickets
ProjeQtOr offers to save tickets from e-mail directly in the application.
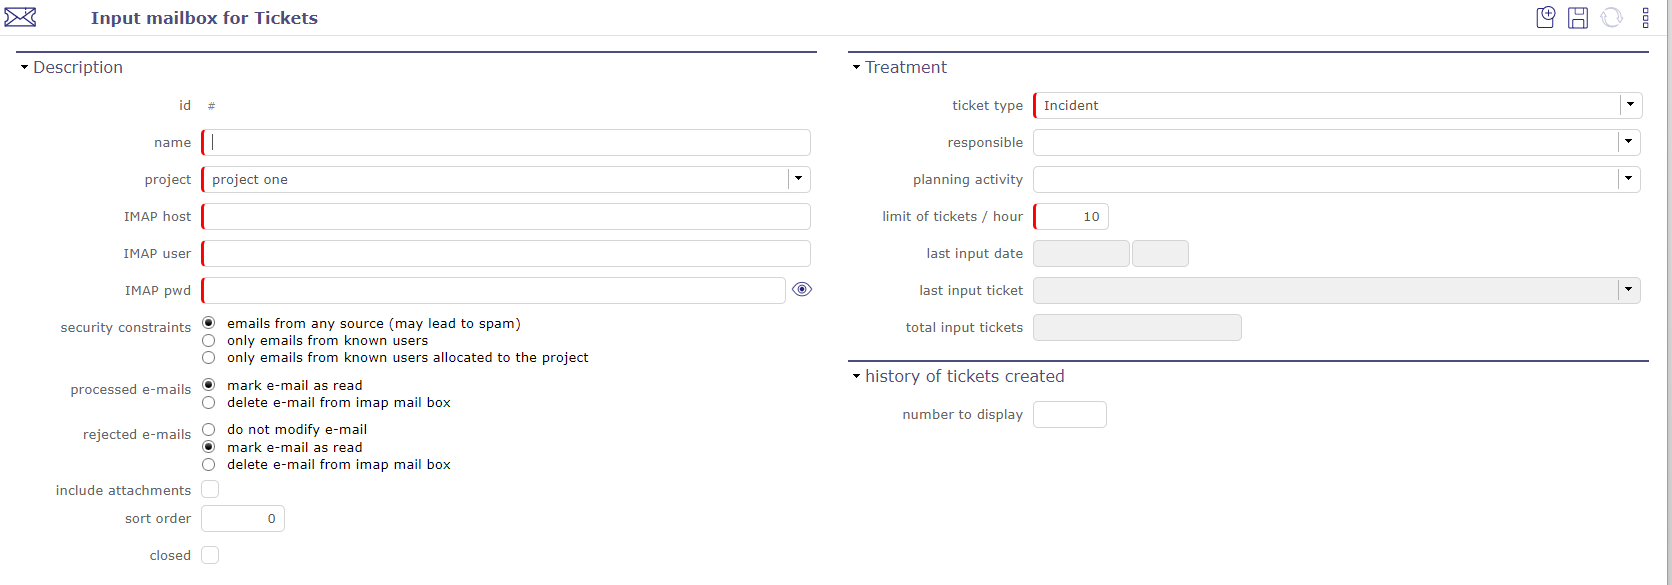
Receive email from ticket screen
You can create new mailboxes for tickets on projects and for each type of ticket configured in ProjeQtOr.
IMAP Host
The address must be an IMAP connection string.
Example to connect to the GMAIL input area, the host must be
{imap.gmail.com:143}INBOX
No protocol is required
Tip
If the certificates are self-signed then you can test to add novalidate-cert in your address
{imap.gmail.com:143/novalidate-cert}INBOX
Security constraints
Mails from any source (may lead to spam)
Allow you to receive emails from anyone and therefore can cause spam
Only mails from known users
Can only receive emails saved in your ProjeQtOr application
Only mails from known users allocated to the project
Only allows you to receive emails saved in your ProjeQtOr application and which are assigned to the project selected in the settings of your mailbox
Processed emails
mark e-mail as read
All emails that are authenticated and correct according to the constraints set, are accepted and marked as read.
delete e-mail from imap mail box
All emails that are not properly authenticated and that do not meet the set constraints are permanently deleted from the IMAP box.
Rejected emails
do not modify e-mail
An email is rejected when it does not meet the criteria for setting up your mailbox. Do not modify the email is an option that will not trigger either deletion or marking.
The rejected email remains unread.
mark e-mail as read
The rejected email is marked as read.
delete e-mail from imap mail box
The rejected email is permanently deleted from the IMAP box.
Other contraints
Include attachments
Indicates whether or not you allow your users to attach attachments.
recipients to follow up
Systematically include the sender and recipients of the email in the follow up of the ticket created or note added by this email.
This includes the main recipients (except the one corresponding to the inbox) and the copy recipients.
pseudo-users
Allow sending from unknown users and keep track of the sender’s emails and copy them.
Results in the creation of fictitious users.
Warning
There is no weight limit in ProjeQtOr but probably your mail server.
Most of the time emails are blocked beyond 5 to 10 MB
Sort order
In case of several mailboxes on a single project, the order of tru of the boxes is important since it is always in ascending order that the mailboxes manage incoming tickets.
Recipients to follow up
Add recipients to the follow up of created items.
Important
CRON Cron must be launched for tickets to be processed in ProjeQtOr, if you do not receive a ticket, try to stop the cron so that it can restart with a refresh of the code.
Limit of tickets / hour
This limit allows you to restrict the reception of emails by hour.
If the number of tickets received is much higher than your limitation then the probability of spam is to be considered or you have incorrectly evaluated the number of tickets to be processed.
When the maximum number of tickets is reached then the mailbox freezes
Only manual intervention by the administrator can unlock it
Its role will consist in reassessing the number of tickets to allow their receipt
Important
If the maximum number of tickets per hour has been reached then you have a rejection message on the history line rejected ticket: ticket limit per hour
History of ticket created
You can choose the number of tickets to display in the history by filling in the “history to display” field
Replies from Email
The use of the mailbox for new tickets is the same for replies.
The reference of the element from which the email is sent is added in the subject of the email.
In the procedure for determining the origin of an incoming email, ProjeQtOr searches for the reference in the subject of the email.
If it is not found
ProjeQtOr considers it a new request to be integrated as a new ticket.
If the reference is found in the subject of the incoming email
When receiving a reply to an email sent by projeqtor, the reply is inserted on the item as a note with an option to include attachments in the attached files.
oAuth2 pour IMAP
The goal is to enable connection to IMAP mailboxes via oAuth2 authentication, for the “Input Mailbox for Tickets.” This allows connection to Office 365 mailboxes.
With oAuth2, the protocol allows the acquisition of client credentials as a connection method.
This method requires no human interaction. When declaring the client, it will be necessary to correctly define that it has all the necessary rights to process messages from the IMAP mailboxes used, such as:
listing unread messages,
marking messages as read,
deleting messages.
Management of processed emails
In the global parameters you can determine, upon receipt of the email, whether you want to mark it as read or delete it.
Receipt of multi-project tickets
You will be able to receive all tickets from different customers on a single IMAP box.
You define several configurations on the same IMAP box with constraints on the existence of the sender and its assignment to the project concerned.
You define a configuration on the IMAP box that has no constraint or just a constraint on the existence of the sender
You set the order in which configurations are processed to ensure that the most permissive configuration is processed last.
Important
Be careful, you will have to be careful to have a “final” configuration that will mark as read or delete emails that are not correctly processed. Otherwise, the IMAP box will keep an increasing amount of emails that will be reprocessed (and rejected) by all configurations on each sequenced cycle of reading IMAP boxes. This will not be controlled by the system.
Tickets dashboard
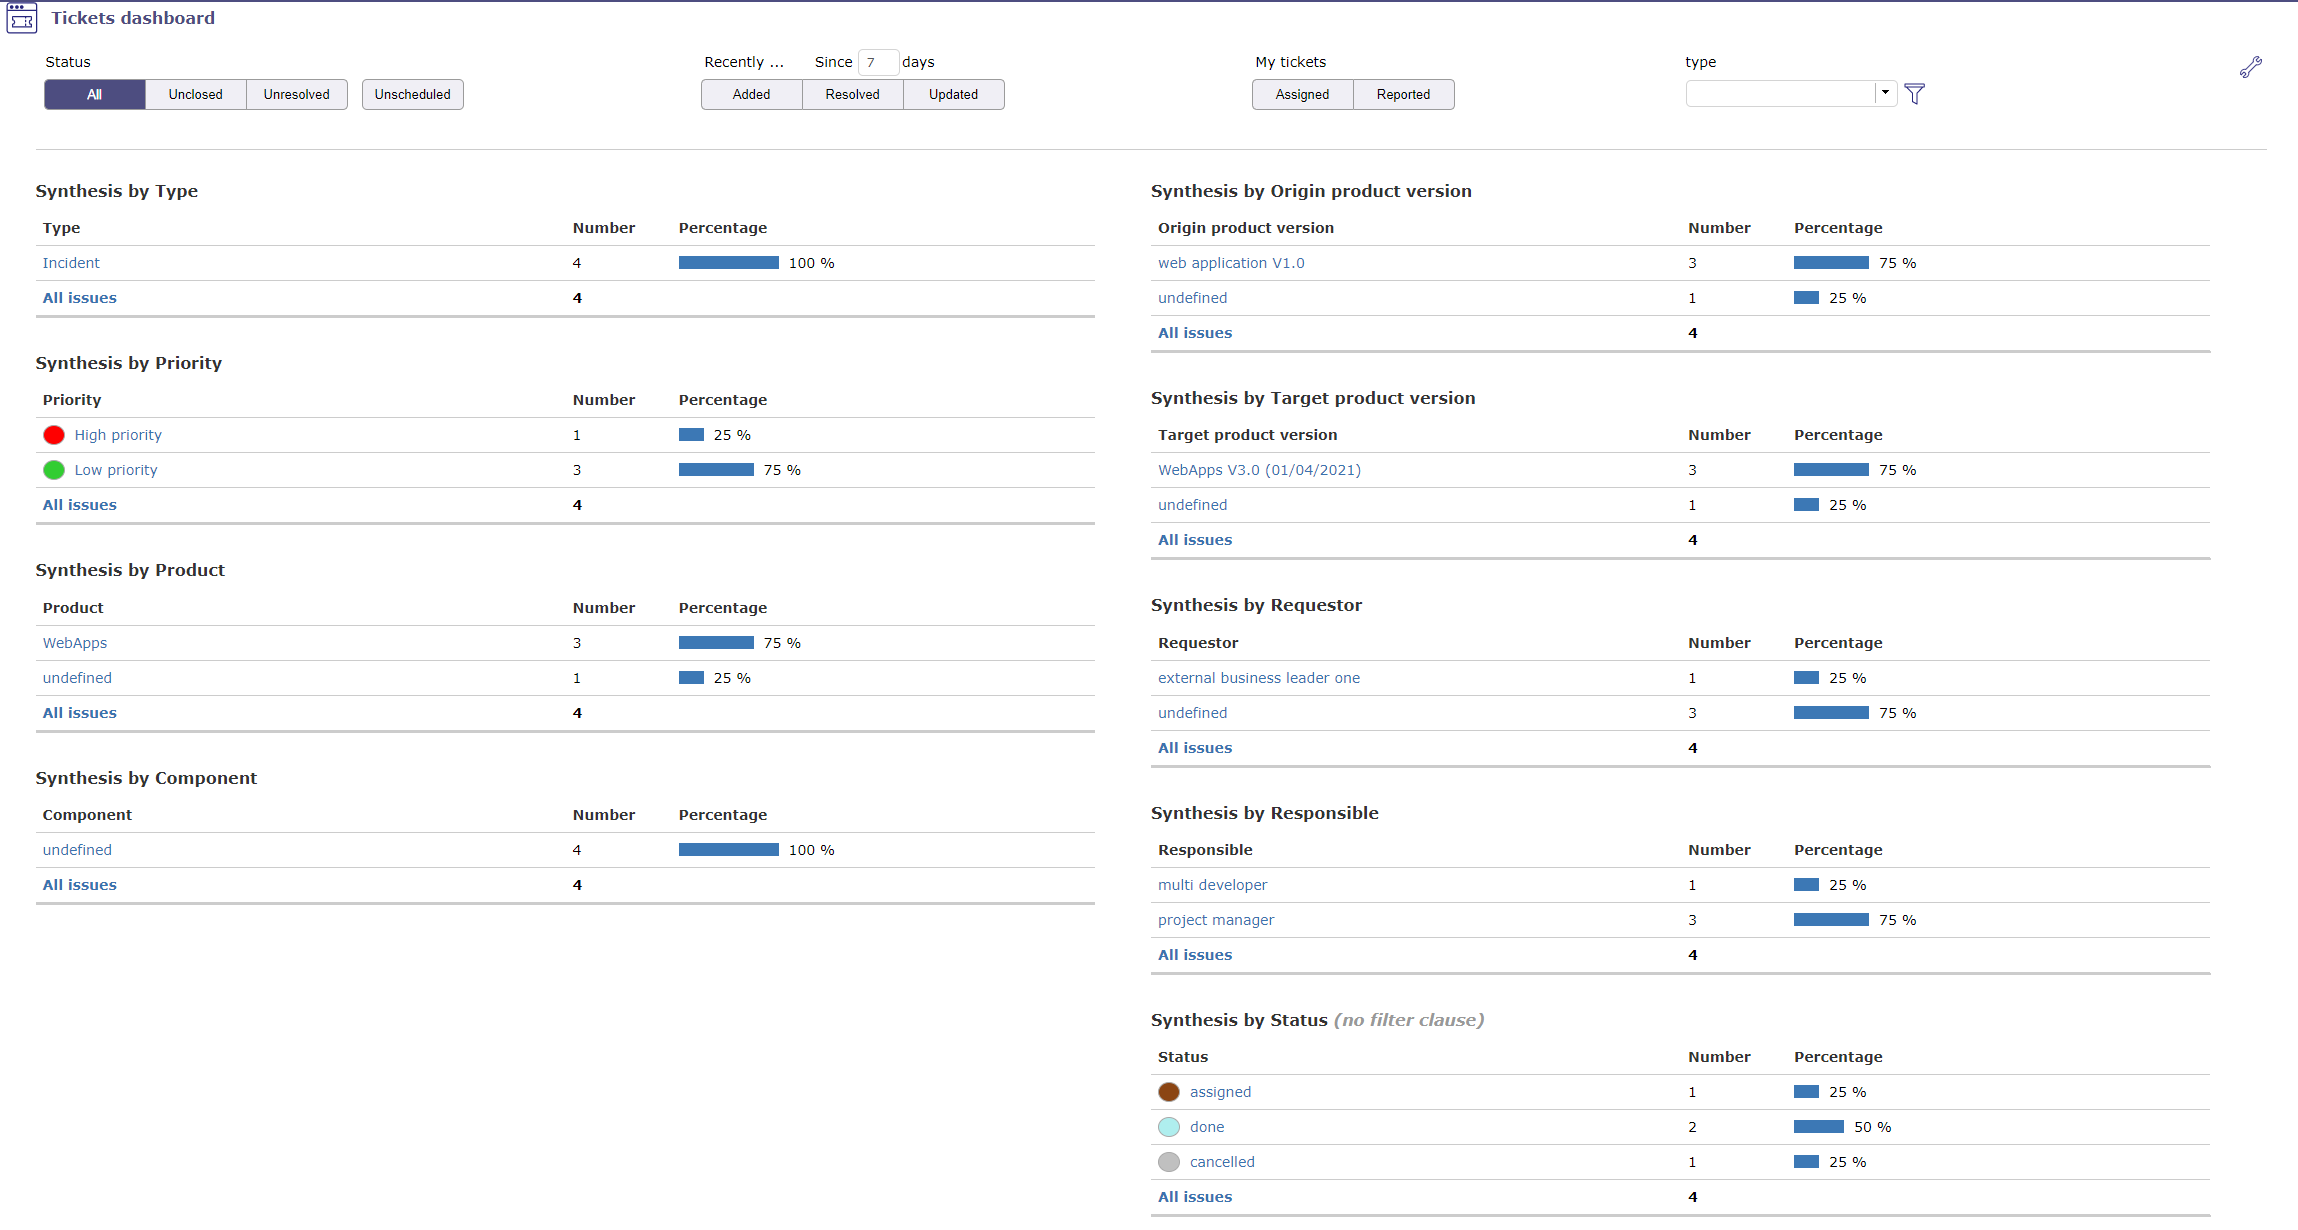
Allows user to have a tickets global view of his projects.
Displays several small syntheses that group the tickets by category: type, priority or by product, component or by state.
The number of tickets is listed. The result is displayed with numbers and as a percentage.
Filters are available to limit scope.
Direct access to the list of tickets
In the various summaries, click on an element to obtain the list of tickets corresponding to this element.
you return to the tickets screen
Parameters
Allows to define reports displayed on the screen.
For Synthesis by status, filter clauses are not applicable.
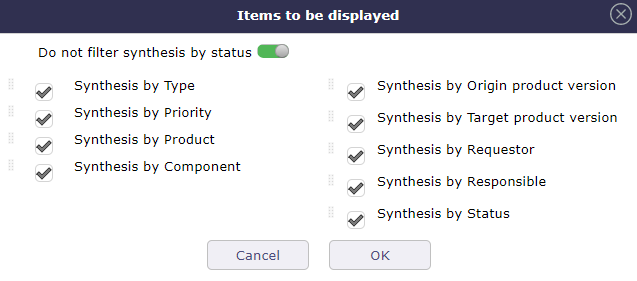
Filters

Filters
Filters allow you to restrict the display of saved requirements
Scope filters
By status, period, duration, closed element, linked to the user or no related…
No resolution scheduled
Unscheduled: Requirements whose resolution is not scheduled in a next product version (target product version not set).
Management of tokens on ticket
You can define and integrate tokens on tickets that you can track on your customer contracts.
The use of this feature is configurable and must be activated in the modules management to have access to it.
A new screen for the definition of tokens will be accessible via the financial part incomes menu.
Token definition
The objective is to define all types of tokens likely to be ordered by your client.
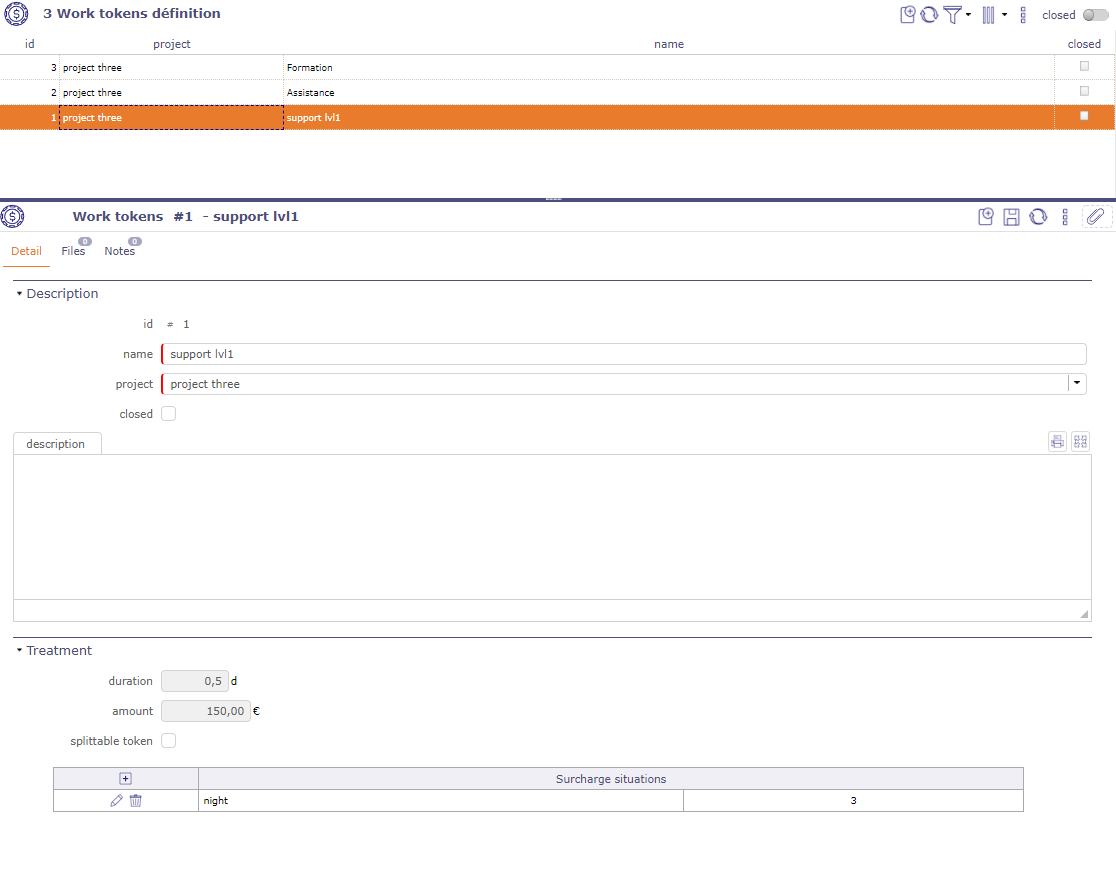
Token definition screen
You set values for a token.
Duration
Value of the token in days or hours (depending on the time recording unit in global parameters)
Amount
Monetary value of the token in € (depending on the currency recording unit in global parameters)
Splittable token
Defines if the token can be divisible, if half tokens can be entered
Surcharge situations
Enter situations of increase that may apply to tokens, such as night work, or even during days normally not worked
Warning
When a token has been used on a ticket, it becomes impossible to modify it.
Similarly, it is not possible to delete or modify the coefficient for a mark-up situation used on a line of work
Token on the client contract
On the client contract, we will add a table with order management functions.
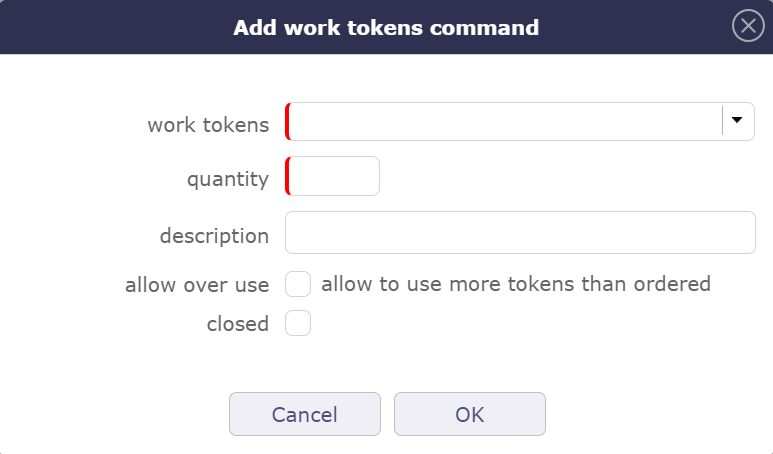
Add work token command
Select the token type from those defined on the project or its parent projects.
Entering the ordered quantity of tokens
Added a descriptive comment
Choose if you can exceed the amount of tokens on the order.
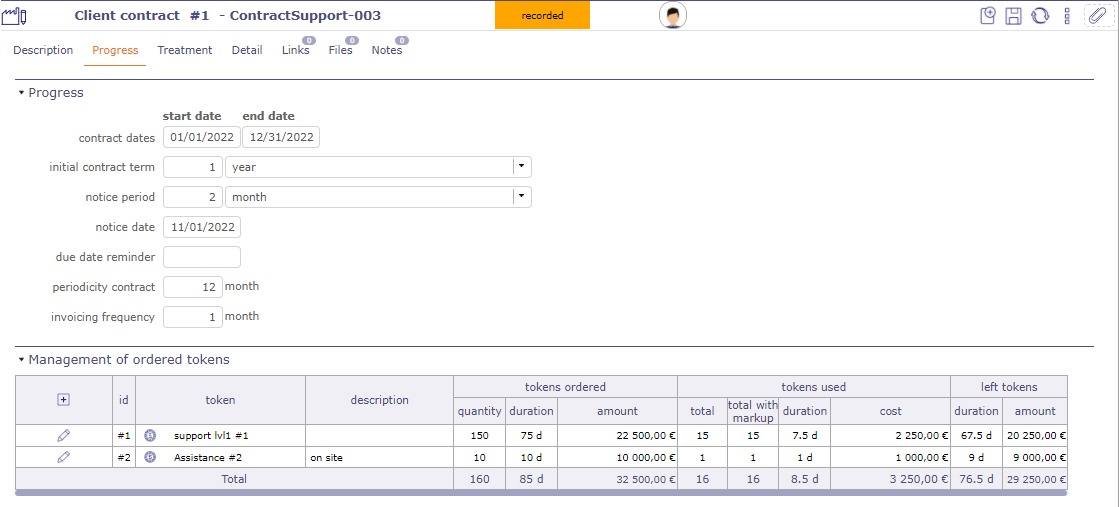
Management of ordered tokens
When you have entered the order, the table will indicate:
In the tokens ordered section
The type of tokens ordered and its description
The total amount of tokens ordered
the total duration to which the number of tokens corresponds
The total amount to which the number of tokens ordered corresponds
In the tokens used part
The total number of tokens used without surcharges
The total number of tokens used with markup
the total duration of the tokens used with and without surcharges
The total cost of tokens used taking into account markups
In the remaining tokens part
Display of the remaining duration of the tokens (duration ordered - duration used)
Display of the number of remaining tokens (amount ordered - amount used)
The Total Line, sums the numbers, amounts and durations (ordered, completed, remaining) for all types of tokens in the contract
Token on tickets
When you create a ticket on the project where the tokens have been defined then you will be able to select these tokens when distributing the work.
You can retrieve these tokens from a parent project.
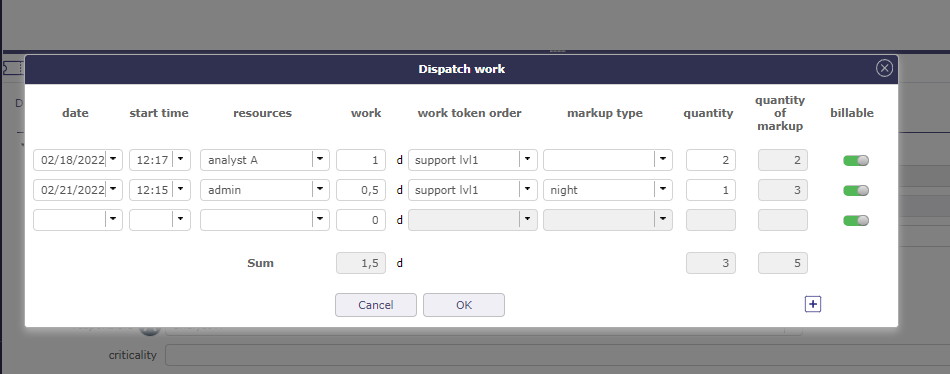
Dispatch work with selection of tokens
Click on  to open the pop-up.
The start date and time are automatically filled in with the current dates and times.
Select the resource working on the ticket
Add the workload for this ticket
Select the token corresponding to the need of the ticket
Determine if a markup type applies to this ticket
The quantity of tokens (without decimal if the token is not divisible)
The mark-up rule, to be chosen from the rules defined on the token
The number of increased tokens calculated by applying the increase rule
If the billable box is checked then the tokens will not be counted on the customer contract.
Warning
The “Mark-up situations” are descriptive and may or may not be related to the time of execution. There will therefore be no automatic determination of the increase situation according to the day or time of the entry of the time spent.
Synchronize activitys and tickets
You can sync tickets with activities. So when you enable this option, all tickets are synced like this:
We attach the activity as a planning activity of the ticket
We link the activity with the ticket
The ticket is entered as the origin of the activity
We modify the state of the element which has the least advanced state to pass it to the state of its binomial (the most advanced).
The other data is not synchronized (a gap may then exist if the ticket is attached to an existing activity).

Synchronization of tickets with activities
You activate the option directly on the project. More flexible solution that will allow great flexibility according to potentially different behaviors depending on the project.
This is a one-time link to avoid recursive updates. A ticket is synchronized with a single activity and an activity will be synchronized with a single ticket (unique pair).
Synchronization functionality set on a project is not inherited to subprojects.
Synchronize existing tickets
When this option is selected, all unclosed tickets whose status is greater than or equal to the trigger status and whose type is the one specified will be synchronized with an activity.
If the ticket is already synced with an activity, nothing happens. This is the case of reactivating a previously deactivated rule.
If the ticket is attached to an open planning activity, the ticket is synchronized with this activity.
If the ticket originates from one and only one unclosed activity, it is synchronized with this activity. Otherwise we will create a new activity that will be synchronized with the ticket.
In all cases of research of the activity to be attached, we make sure that it is not already synchronized with another ticket and that it does not originate from another ticket
When a Ticket or Activity item is edited and synced to a pair, changes to some fields carry over to their pair:
Name
Project
State
Responsible
Product
Component
Target product version
Target component version
The project
When you change the project of a ticket attached to a planning activity, a consistency check prevents you from making this modification since the two elements must be linked on the same project.
In case of synchronization, the control is ignored and you can change the project on one of the two elements, the modification will be passed on to the other.
If a ticket changes project or type before its triggered state, it is not synced.
It is then subject to the new project or new type rule.
A check is carried out to find out if the ticket is not already in the trigger state for the new project or the new type and to trigger the synchronization in this case.
If a ticket changes project or type after its triggered state, it’s already synced. He continues to be synchronized with his partner according to the rule of his original project, whether his new project has a synchronization rule or not.
The change of project of the ticket can also come directly from a modification on the ticket or from a modification of its binomial activity.
The rule is always the same: pair synchronization is maintained.
The statues and the workflow
On certain status changes, certain fields may become mandatory and these fields are not necessarily synchronized. Like the description or the result.
In this case, these fields - not synchronized - are automatically filled in if they are in the element being modified.
If, despite everything, there are still invalid checks for the element to be synchronized, the update is globally rejected with an explicit message.
For example, closing a ticket associated with an activity on which there is still work to do should not be done.
In order for status changes to be consistent, the workflows between the ticket and the related activity should be the same to avoid inconsistencies in status changes.
A mechanism will still make it possible to override the rules of the workflow for the element which will change state automatically.
Essential, especially when creating the activity, which must be created directly in the same state as the ticket, but which will also be applied later.
For example, if an activity has moved into a state that does not belong to the ticket’s workflow, the state change is made to keep synchronization.
Warning: This can lead to placing the ticket in a state from which it can no longer exit (because it is outside its workflow). In this case, only the change of state of the activity can unlock the ticket.
The same case can be produced on the activity which would be blocked following the change of state of the ticket.
Workload
Attaching the activity as the Ticket’s planning activity will impact the load:
The charge charged in real time to the ticket is recorded in the actual costs of the activity
The charge charged in real time on the ticket is automatically decremented in the remaining charges of the activity
In the case of synchronized items, you can only enter actual load on the ticket.
This charge will then be properly accounted for on the activity via the Planning Activity mechanism.
Deleting a synced item
When a Ticket or Activity item is deleted and synced to a pair, a confirmation message is displayed to the user.
In this case, the associated item is not deleted, but the synchronization is deleted.
Click on define synchronization to open the pop-up.
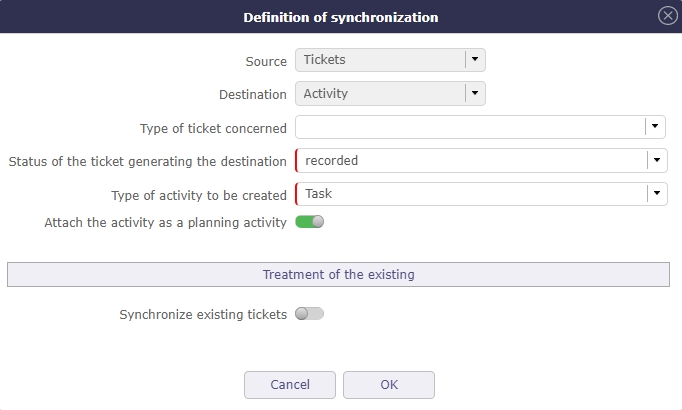
Definition of synchronization
When activating the function on a project, a pop-up window will be displayed allowing to define:
The status of the ticket automatically generating the activity
The type of ticket concerned (optional) - don’t fill to allow all types of tickets
The type of activity to create
Options
An option to automatically trigger the attachment of the activity as a ticket planning activity
An option to sync existing tickets
Desactivation of the function
In case of deactivation of the function at the project level, a check is carried out and alerts the user if there are tickets synchronized with activities.
If there are synchronizations in progress, a pop-up window opens to display the number of existing pairs, distinguishing the number of closed and unclosed.
If the number of existing pairs is not zero, you can select the existing links that must be kept or deleted.
In case the links are deleted, the function is completely disabled
In case the links are not deleted, the function is disabled only for tickets not yet synchronized. Tickets already synced remain synced.
There is then no longer any way to delete the synchronization (except to delete one of the elements of the pair).
Vote on ticket
It is possible to vote on tickets. In the detail tab of each ticket, find the voting section. The target value, current value, number of votes and fill rate are displayed.
Click on the vote button to assign a vote on the selected item.
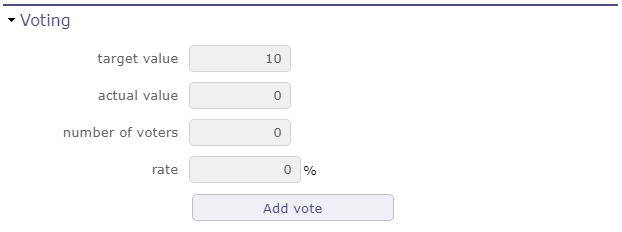
Voting Section
In the voting window, several pieces of information such as the maximum point limit of the vote that you can use on the vote of the item in question.
Your personal vote which is not necessarily identical to the maximum points that you can award.
And finally the number of points that you have left to spend in the period of use set upstream in the rules for awarding and using votes.
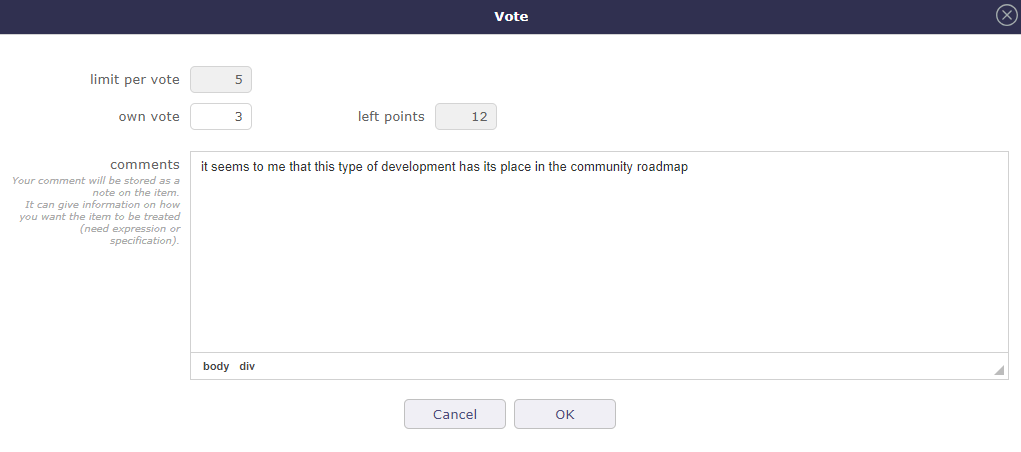
Voting pop-up
Once you have validated your vote, if the specific access dedicated to voting have been activated, a table appears to display the names of the voters and the points that each of them has assigned to the element.
If several people have voted, the cumulative number of their points is displayed in the current value.
You continue to see the number of your points already assigned, directly in the vote button or in the table if you have the right to see it.
In the specific access, if the display of the table is deactivated, you can display at least the names of the voters.
In any case, the names of the voters and the points they have assigned are necessarily displayed in the table.
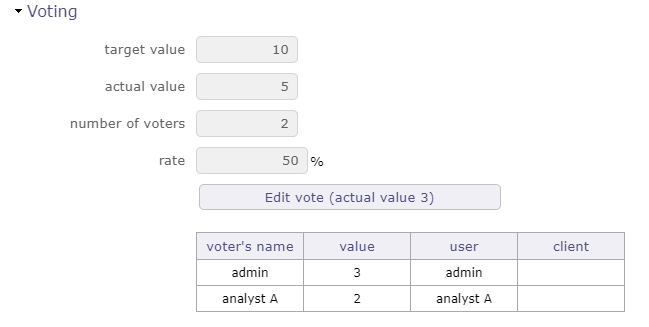
Voting table

